
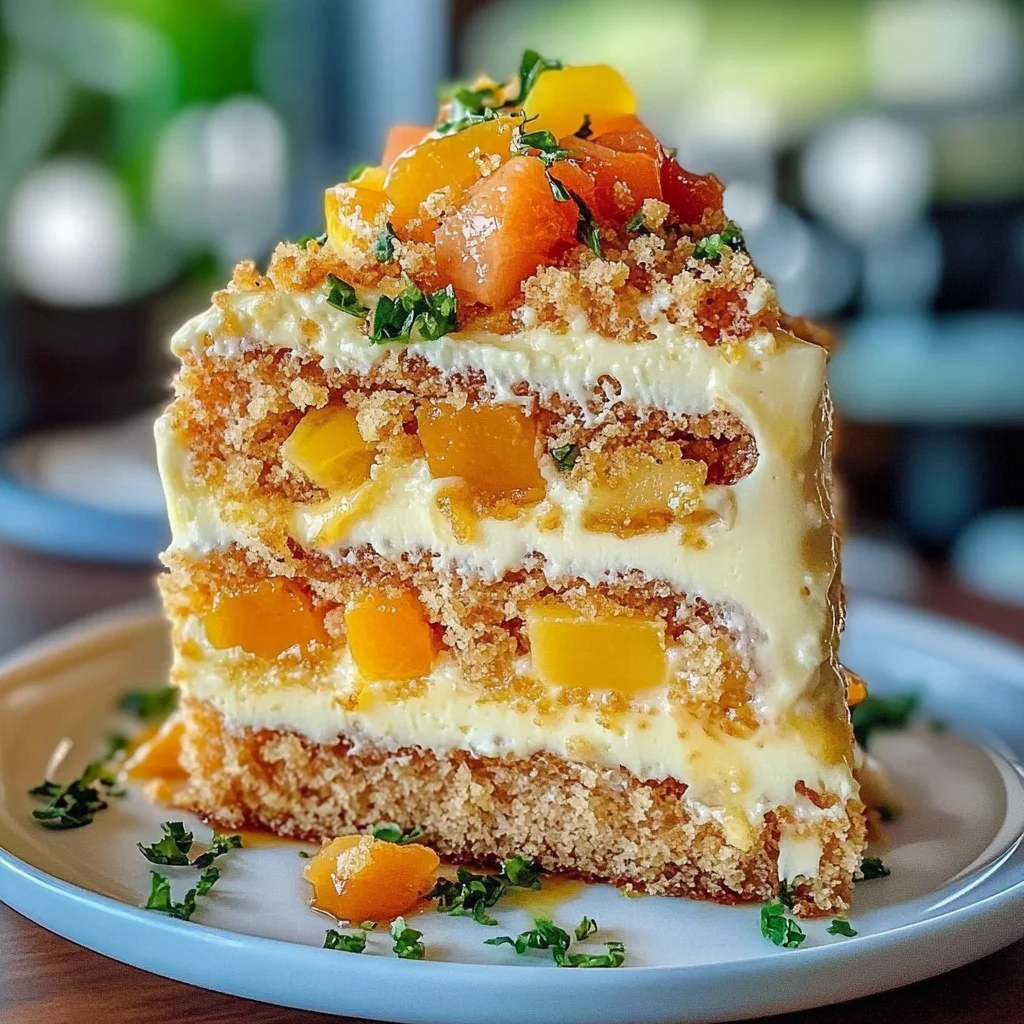
Imagine sinking your fork into a slice of Hawaiian cake, where the moist, tropical delight bursts with vibrant flavors of sweet pineapple and creamy coconut. The aroma wafts through the air, inviting you to take a bite that promises an explosion of sunshine in every mouthful, making it hard to resist going back for seconds.
This cake isn’t just a dessert; it’s a celebration on a plate, perfect for summer barbecues or cozy family gatherings. I can still recall my grandmother’s laughter as we baked this masterpiece together, filling the kitchen with joy and warmth. Each slice transports me back to those cherished moments, ensuring that every occasion becomes memorable with this delicious treat.
Why Is hawaiian cake So Irresistibly Good?
Tropical flavors combine beautifully in this cake, delivering a slice of paradise with every bite. Moist texture comes from crushed pineapple and shredded coconut, making it a delightful treat for any occasion. Quick prep time allows you to whip it up in just 20 minutes—perfect for last-minute gatherings! Crowd-pleasing appeal ensures that everyone will be coming back for seconds. Plus, the rich cream cheese frosting adds a luscious finish that elevates this dessert to new heights.
hawaiian cake Ingredients
For the Cake
- 1 cup all-purpose flour – This provides the structure needed for a moist and fluffy hawaiian cake.
- 1 cup granulated sugar – Sweetens the batter and helps create a lovely golden crust.
- 1/2 cup unsweetened shredded coconut – Adds a delightful texture and tropical flavor to the cake.
- 1 tsp baking powder – A leavening agent that ensures your cake rises beautifully.
- 1/2 tsp baking soda – Works in tandem with baking powder for that perfect lift.
- 1/4 tsp salt – Enhances flavors and balances sweetness in your cake.
- 1/2 cup unsalted butter (softened) – Provides richness and moisture, making every bite heavenly.
- 2 large eggs – Binds the ingredients together while adding protein and moisture.
- 1 cup crushed pineapple (drained) – Infuses the cake with a juicy, tropical essence.
- 1/4 cup milk – Keeps the batter smooth and adds extra moisture.
For the Frosting
- 1 cup cream cheese (softened) – Creates a creamy, tangy base for your frosting that’s simply irresistible.
- 1/2 cup unsalted butter (softened) – Enhances richness in the frosting while providing a smooth texture.
- 3 cups powdered sugar – Sweetens the frosting to perfection, balancing the tanginess of cream cheese.
- 1 tsp vanilla extract – Adds depth of flavor, making your frosting truly special.
How to Make hawaiian cake

1. Preheat the oven to 350°F (175°C). Grease and flour a cake pan to ensure your tropical treat releases easily once baked.
2. Whisk together the flour, sugar, shredded coconut, baking powder, baking soda, and salt in a mixing bowl until evenly combined. This will create a lovely base for your cake.
3. Cream the softened butter in another bowl until smooth. Add the eggs one at a time, mixing well after each addition to incorporate a rich flavor and texture.
4. Stir in the crushed pineapple (drained) and milk until fully blended into the mixture. The pineapple adds that delightful tropical twist that makes this cake special!
5. Gradually add the dry ingredient mixture to the wet ingredients, mixing until just combined. Be careful not to overmix; you want your hawaiian cake light and fluffy.
6. Pour the batter into the prepared cake pan and smooth the top with a spatula for an even bake.
7. Bake for 30 minutes or until a toothpick inserted in the center comes out clean. Your kitchen will smell heavenly while it bakes!
8. Cool the cake in the pan for 10 minutes before transferring it to a wire rack to cool completely. This helps maintain its moisture and texture.
Prepare the Frosting:
9. Beat the cream cheese and softened butter in a mixing bowl until smooth and creamy, creating a luscious frosting that complements your cake perfectly.
10. Gradually add powdered sugar and vanilla extract, mixing until well combined and fluffy—a delightful frosting awaits you!
Assemble the Cake:
11. Spread the cream cheese frosting evenly over the top of your completely cooled cake for that final touch of sweetness.
12. Optional: Garnish with additional shredded coconut or pineapple slices for an extra pop of tropical flair!
Exact quantities are listed in the recipe card below.
Tips for the Best hawaiian cake
- Proper Measuring: Always use the spoon-and-level method for flour to prevent a dense cake. Too much flour can ruin your hawaiian cake’s texture.
- Egg Temperature: Ensure your eggs are at room temperature before mixing; this helps create a smoother batter and better rise.
- Pineapple Drainage: Make sure to drain the crushed pineapple thoroughly to avoid excess moisture, which can lead to a soggy cake.
- Frosting Consistency: Beat the cream cheese and butter until completely smooth before adding powdered sugar. This prevents lumps in your frosting.
- Cool Completely: Allow the cake to cool completely before frosting. Applying frosting on a warm cake can cause it to melt and slide off.
How to Store and Freeze hawaiian cake
Room Temperature: Keep your hawaiian cake in an airtight container at room temperature for up to 3 days. This helps maintain its moist texture.
Fridge: If you want to extend its freshness, store the cake in the refrigerator for up to a week. Just remember to cover it well to prevent drying out.
Freezer: To freeze your hawaiian cake, wrap slices in plastic wrap and then foil. It can last up to 3 months in the freezer, perfect for future cravings!
Reheating: When ready to enjoy, thaw overnight in the fridge or at room temperature for a couple of hours. Reheat individual slices in the microwave for about 10-15 seconds if desired.
hawaiian cake Your Way
Feel free to unleash your creativity and add a personal touch to this delightful recipe!
- Gluten-Free: Substitute all-purpose flour with a gluten-free blend for a deliciously moist cake that everyone can enjoy. This way, you can cater to those with dietary restrictions while still delivering on taste.
- Pineapple Upside Down: Layer fresh pineapple slices on the bottom of your cake pan before pouring in the batter for a stunning presentation. The caramelized fruit adds an extra layer of sweetness that complements the coconut beautifully.
- Coconut Cream: Replace half of the butter with coconut cream for an even richer tropical flavor. This swap will enhance the coconut essence, making every bite feel like a slice of paradise.
- Spiced Twist: Add 1 teaspoon of cinnamon or nutmeg to the dry ingredients for a warm, aromatic hint. This subtle spice elevates the tropical profile and gives your cake a unique depth.
- Nutty Addition: Fold in 1/2 cup of chopped macadamia nuts or walnuts into the batter for added crunch and flavor. The texture contrast brings a delightful surprise to each slice.
- Zesty Citrus: Incorporate the zest of one lime or orange into the batter for a refreshing citrus kick. It brightens up the flavors and adds an irresistible zing that dances on your palate.
- Chocolate Drizzle: Drizzle melted dark chocolate over the frosting for a luxe finish that beautifully contrasts with the tropical flavors. This indulgent touch will make your cake truly irresistible at any gathering.
Make Ahead Options

This Hawaiian cake is not only a delightful treat, but it’s also perfect for meal prep, allowing you to save time while still enjoying delicious homemade flavors. You can prepare the dry ingredients—1 cup of all-purpose flour, 1 cup of granulated sugar, ½ cup of shredded coconut, and the leavening agents—up to 24 hours in advance. Additionally, the wet ingredients like the softened butter, eggs, crushed pineapple (1 cup), and milk (¼ cup) can be mixed together ahead of time and stored in the fridge for up to 3 days before baking. Just remember to preheat your oven to 350°F before you combine the wet and dry ingredients and pour them into your prepared cake pan. For the frosting, whip together 1 cup of softened cream cheese with ½ cup of unsalted butter, adding in the powdered sugar and vanilla extract just prior to serving for a fresh taste. With these tips, you’ll have a moist Hawaiian cake ready to impress your guests with minimal last-minute effort!
hawaiian cake Recipe FAQs
What can I use instead of all-purpose flour?
If you’re looking for a gluten-free option, you can substitute all-purpose flour with a 1: 1 gluten-free flour blend. Alternatively, almond flour or coconut flour can work well, but you’ll need to adjust the quantity and possibly add a binding agent like xanthan gum for best results.
How should I store leftover Hawaiian cake?
To keep your Hawaiian cake fresh, store it in an airtight container at room temperature for up to 3 days. If you want to extend its life, refrigerate it for up to a week. Just remember to take it out about 30 minutes before serving so it regains its moist texture.
Can I freeze Hawaiian cake?
Absolutely! This cake freezes beautifully. To freeze, wrap individual slices or the whole cake tightly in plastic wrap and then in aluminum foil. It will stay good in the freezer for up to 3 months. Just thaw it overnight in the refrigerator before enjoying!
What if my cake is too dry?
If you find that your Hawaiian cake has turned out dry, there are a couple of tricks you can use next time. Make sure not to overmix after adding the dry ingredients—mix until just combined! You could also try adding an extra tablespoon of crushed pineapple or even a splash more milk for added moisture.
How many servings does this recipe yield?
This delicious Hawaiian cake serves about 4 people, making it perfect for small gatherings or family celebrations. If you’re expecting more guests, consider doubling the recipe and baking two layers for an impressive tiered cake!
Can I make this cake without eggs?
Certainly! You can replace each egg with a flax egg (1 tablespoon ground flaxseed mixed with 2.5 tablespoons water) or use unsweetened applesauce (1/4 cup per egg). Both alternatives will help maintain moisture while ensuring your cake remains fluffy and delightful!